On this page
Project Code Challenge Solver
The code challenge solver provides an in-browser IDE for editing and running assessments.
Completing a Project Code Challenge Quick Start
When you start a project code challenge, you'll be provided some instructions and a starting point for your solution.
Once you've read the instructions, use the IDE to code your solution by editing existing files and/or adding new files. Use the RUN TESTS button to verify your code, unless this is a web-only challenge without tests. For web-only challenges, use the WEB PREVIEW button to review your work.
You will be notified once you have successfully passed the test cases for the challenge. Once you are comfortable with your solution, use the SUBMIT button to move on to the next challenge or to submit your assessment.
Layout
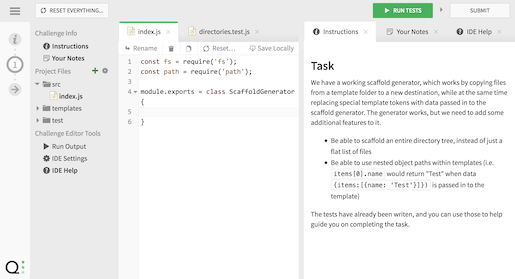
The Project Challenge IDE is divided into 3 parts:
- At the top is a toolbar with buttons for resetting your solution, running tests, and submitting the solution
- Along the left side of the screen are all the tabs you can open for instructions, editing files, etc.
- The main body of the screen includes all the tabs you have open.
You can re-arrange tabs by dragging them around to any of the 4 available sections. You can adjust the layout of these sections by dragging the bar between them.
Shortcut Key Commands
- ⌘CTRL + Enter: Run your solution against your tests (if tests are enabled for this challenge).
Challenge Info
Instructions
Carefully read and follow the instructions in this panel for information on how to solve the assessment.
Your Notes
As you work on your solution, feel free to add detailed notes about how it works, reasoning behind your choices, documentation, etc.
This section is full-markdown enabled, so you can include lists, tables, code sections, etc.
Project Files
The Project Files file tree represents the code for your solution.
File Commands
Each file will have various commands associated with it, such as rename, delete, or configuring access levels. Most file commands are in 3 ways:
- If the file is open, they will be available directly in the file editor's toolbar
- Use the file menu button inside the file tree. When hovering over a file, it will either be a menu icon () or the access icon if the file is not editable.
- Right-click on the file name in the file tree, which will bring up the file menu.
Basic File Editing
Opening Files
Click on a file in the file tree to open its editor. Our code editor is based on CodeMirror. It provides many of the features you may expect from a normal IDE, though it is much simpler.
You can use many of the keyboard commands you may expect from a normal editor, including highlighting a block of code and using Tab to indent and Shift + Tab to unindent.
Creating Files & Directories
There are several ways you can create or add files to our IDE:
- In either the Project Files or Reference Solution Files tree, use the plus icon () to create a new file or directory.
- Use the Duplicate () action from the file commands.
- Drag-and-drop files from your system directly into the IDE. You can drag in single files, groups of files, or even complete file trees.
Moving and Renaming Files
You can move or rename a file using the Rename () action from the file commands.
To move a file to a different folder, simply change its path in the rename dialog.
Deleting Files
You can delete a file using the Delete () action from the file commands.
A deleted file is moved to Deleted Files. You can undelete the file from this location if it was a mistake.
Warning
Files in this section are only saved until the page is reloaded.
Resetting Files or the entire solution
You can use the Reset () to reset a given file to its original form at the beginning of the challenge. This option is only available for files that were originally part of the solution, and have not been renamed.
If you wish to start over completely, you can use the RESET EVERYTHING… command in the toolbar.
Web IDE Tools
Run Output
The Run Output panel will give you details information about the tests that were run. If you have any tests that fail, you'll see a red bar and one or more red exclamation marks next to the failed tests.
Debugging
Most compilation & runtime errors should show up automatically in the results pane.
For further debugging, you can write messages out to the console or system output. These messages will show up in the results pane.
Note
Due to the solution code being executed in a short-lived container, Qualified does not currently support interactive debugging.
IDE Settings
The IDE settings tab lets you customize how the editor looks and works.
- Theme: Light or Dark, depending on your mood.
- Editor Mode: This allows you to enable Vim- or Emacs-like keyboard controls.
- Tab Mode: We won't complain, choose the indentation style you prefer.
- Line Wrapping: You can disable soft wraps, if you like to scroll horizontally.
- Line Numbers: You can guess this one.
- Auto Close Brackets: Typing certain brackets will cause the matching bracket to be added automatically.
-
Smart Indent: Enables IDE-like automatic indenting based on what characters you type.
- Re-Indent When Typing Special Characters: Automatically adjusts indentation on certain characters.
Help
You can browse help articles in the help pane like a mini web browser. The home button () will take you back to general help for the challenge solver.
If you need to see a help file large, click the new window icon ().