On this page
- Getting Started
- How Automated Workflows Work
- Default Workflow
- Basic Workflows
- Custom Workflows
- Rearranging Workflows
- Automation Recipes
- Automate Candidate Categorization
- Automatically Approve Candidates
- Automatically Reject Candidates
- Automatically Add Candidates to Labels
- Integrate Qualified into a Hiring Process
- Overriding the Redirect URL
- Send successful candidates to the next assessment
- Send unsuccessful candidates to another assessment for further evaluation
- Assign Team Members to evaluate candidates
- Assign the same team members every time
- Assign different team members based on score
Automating Assessment Workflows
Use simple yet powerful workflows to automate processing a candidate's assessment based on their score and timing.
These workflows can be used to automatically approve or reject a candidate, show a custom message, send them to a new assessment or external website, assign them to team members or labels, or even trigger custom webhooks.
Getting Started
From the assessment details page, click the ADD A WORKFLOW button. This will take you to the assessment editor, with the basic & default workflows ready to get started quickly.

How Automated Workflows Work
Workflows work by matching the against the score and/or timing of the assessment. They are matched in a top-down order as you see them on the page, and only the first workflow to match is processed.
Example
For example, if the top workflow say WHEN Score is at least 50%, and the second says WHEN Score is at least 25%, the second workflow will never be processed.
Default Workflow
At the bottom of the list is the Default Workflow. This workflow is only processed if none of the other match. If you have no other workflows enabled, the Default Workflow will always be used, and can be useful if the Qualified Assessment is part of a larger hiring or education process to show custom messages or redirect the candidate to a different website.
Basic Workflows
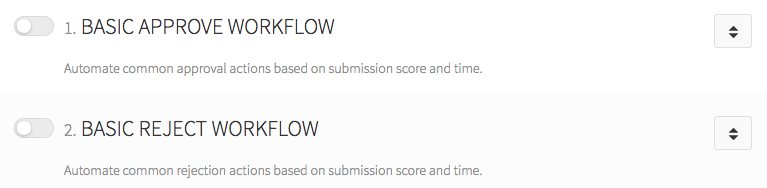
To make it easier to get started, basic approve and reject workflows are automatically added (but not enabled) to every assessment. These workflows have fewer options, but make it easy to get started with our automation process.
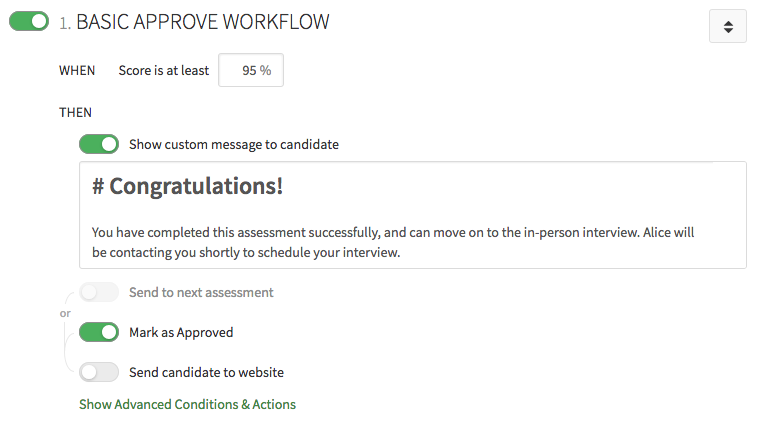
To enable, click the slider or title, and add in a minimum or maximum score to trigger the workflow. Then enable one or more of the available options (see below for details).
Connected Options
- Send to Next Assessment
- Mark candidate as…
- Send candidate to website
These three options are interconnected. If you choose to send the candidate to a next assessment, you cannot set their status, because they will be reset to Invited automatically. You also cannot send them to a website, since it would conflict with the next assessment.
Likewise, if you choose to set their status, or send them to a website, you cannot send them to a new assessment.
You can, however, both set their status and send them to a website.
Premium Feature Options
On custom plans, you can add more advanced options to the basic workflows by clicking Show Advanced Conditions & Actions.
Custom Workflows
Custom workflows provide maximum flexibility in configuring your process. A key benefit is that you can create as many workflow paths as you need.
Premium Subscription Feature
Custom workflows are only available if you have the Advanced Assessment Workflows feature enabled on your subscription.
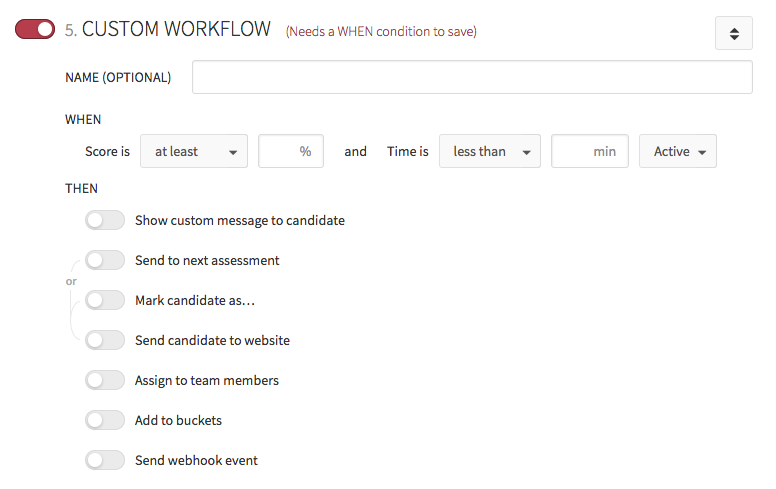
Click on ADD CUSTOM WORKFLOW to insert a new, custom workflow. These are more advanced workflows, which can be triggered on high- or low-scores, and/or slow- or fast-timing.
You can give your custom workflow a name to help you keep track of the purpose of it. Custom workflows have the all of the same actions available to them as basic workflows, including all the advanced actions.
Tip
If you add a custom workflow, and do not use the basic workflows, they won't show up by default the next time you edit the assessment. You can add them back in at any time using the RESTORE BASIC WORKFLOWS button.
Rearranging Workflows

The order matters, since the first workflow to match is the one that is processed. Use the drag handle on the right side of the workflow to drag the workflow up or down to re-arrange them.
Automation Recipes
Below are a few examples which can be used as recipes to help you get started with automated workflows.
Automate Candidate Categorization
You can easily approve, reject, and add labels to candidates based on score.
Automatically Approve Candidates
- Enable the Basic Approve Workflow
- Set the minimum score
- Enable Mark as Approved
Automatically Reject Candidates
- Enable the Basic Reject Workflow
- Set the maximum score
- Enable Mark as Rejected
Automatically Add Candidates to Labels
-
For default label assignment (when not matching the score):
- Enable the Basic Approve Workflow
- Enable Add to labels and enter any labels you want to add
-
For label assignment based on score:
- Enable the Basic Approve Workflow or Basic Reject Workflow
- Set the minimum or maximum score
- Click Show Advanced Conditions & Actions
- Enable Add to labels and enter any labels you want to add
Note
Only the first matching workflow is processed. If you want to include the same label in the default workflow and in an approve or reject workflow, you'll need to copy it into each step.
Integrate Qualified into a Hiring Process
If you have an existing hiring process, and would like to integrate Qualified in the middle, one solution would be to use an automated workflow to send the candidate back to the external process after they complete.
-
First, unless you have API access configured on your account to automate invitations, you'll need to disable Invite Only on the assessment
- Click on General Info & Settings
- Then click Invitation Settings
- Uncheck Invite Only
- Click SAVE
- In your application process, send the candidates to the shareable link now visible on the assessment page.
-
Enable the redirect back to your process:
-
If you always will send the candidates to the same URL
- Enable the Default Workflow by clicking the slider
- Enable Send candidate to website
- Add the website or page to return to after the assessment is complete
-
If you want to send passing candidate to a different URL
- Enable the Basic Approve Workflow
- Set the minimum score
- Enable Send candidate to website
- Add the website or page to return to after the assessment is complete
-
If you want to send failing candidate to a different URL
- Enable the Basic page Workflow
- Set the maximum score
- Enable Send candidate to website
- Add the website or page to return to after the assessment is complete
In all cases above, you can also add a custom message to be shown alongside the redirect explaining what's happening. Otherwise, the redirect will automatically trigger after a few seconds.
-
Overriding the Redirect URL
You can provide the redirect URL dynamically by adding it as a parameter to an invitation or assessment link. This can be useful if you need to use the same assessment, but send the candidate back to different pages based on where they came from for a more seamless experience.
To override or configure a redirect URL, simply add the parameter redirectUrl to the end of the invitation or assessment link. For example, if you want to redirect the candidate to https://example.com, it might look like the following:
// Using a URL library is generally best, but in a pinch, simply
// appending the correctly encoded URL will work.

// invitation link, which has existing parameters
url = invitationLink + "&redirectUrl=" + encodeURIComponent("https://example.com");

// direct link, which has no parameters
url = assessmentLink + "?redirectUrl=" + encodeURIComponent("https://example.com");
Note that there is only one option for the URL, so the same URL will be used whether the candidate succeeds or fails.
Go protocol-less for cleaner URLs
Qualified will also automatically detect URLs without a protocol, and prepend https://, so in most cases, you can exclude the protocol for a cleaner link.
Send successful candidates to the next assessment
You can easily have the candidate move through several assessments based on if they are successful.
- Enable the Basic Approve Workflow
- Set the minimum score
- Enable Send to next assessment and select the next assessment from the list
Send unsuccessful candidates to another assessment for further evaluation
You can use automation to further test candidates who may have struggled with an assessment, enabling you to find candidates who may have struggled with part but are still overall a success.
- Enable the Basic Reject Workflow
- Set the maximum score to be considered failing
- Click Show Advanced Conditions & Actions
- Enable Send to next assessment and select the next assessment from the list
Assign Team Members to evaluate candidates
Use Assign to team members to ensure that the right team members are reviewing each candidate.
Assign the same team members every time
- Enable the Default Workflow
- Enable Assign to team members and add the team members
Assign different team members based on score
This could be useful if, for example, you only want to have a developer evaluate a candidate who performed above a certain level, otherwise you want your recruiting team to handle rejecting the candidate without further review.
- Enable the Basic Approve Workflow and/or Basic Reject Workflow
- Set a minimum or maximum score
- Click Show Advanced Conditions & Actions
- Enable Assign to team members and add the team members